Welcome to the next episode in our GitHub for Beginners series, where we’re diving into the world of GitHub Copilot. This is our fifth episode, and we’ve already talked about Copilot in general, some of its essential features, how to write good prompts, and a bit about security best practices. We have all the previous episodes on our blog and available as videos.
Today we’re diving a little deeper—we’re using GitHub Copilot to help us build a backend REST API. We’ll walk through how to build the backend for Planventure, a travel itinerary builder that helps users plan their trips. You can find a full description of what we’ll be building in this repository.
What you’ll need and what we’re building
Before we get started, here’s what you’ll need to install:
- A code editor like VS Code
- Python
- SQLite Viewer to view database tables
- An API client like Bruno to test your routes
- Access to GitHub Copilot — sign up for free!
What we’re building:
We’re creating a minimum viable product (MVP) for Planventure’s backend API. In the next episode, we’ll build the frontend to connect to the API.
Here’s what we’ll include:
- REST API built with Flask
- Database support using SQLAlchemy
- User authentication (with password hashing and JWTs)
- Full CRUD functionality for trips
Each trip will include:
- Destination
- Start and end dates
- A basic itinerary with location coordinates (perfect for maps)
At the end of this, we want to have a working API that handles user authentication and basic trip management.
Step 1: Setting up the environment
Fork and clone the planventure repository.
Once you’ve done that, cd into the planventure-api directory in your code editor.
git clone https://github.com/github-samples/planventure
cd planventure-api
Open up your terminal and run the following commands to create and activate a virtual environment.
python3 -m venv venv
source venv/bin/activate
Assuming you’re using VS Code, you’ll see venv in the status bar at the bottom. If you’re using another editor, be sure to verify that you’re in your virtual environment.
Staying in your terminal, run this command to install dependencies:
pip install -r requirements.txt
Run the following command in your terminal to start the server:
flask run --debug
You should see your server running on 127.0.0.1:5000. Use Bruno to make a GET request to that URL and you should see the following welcome message:
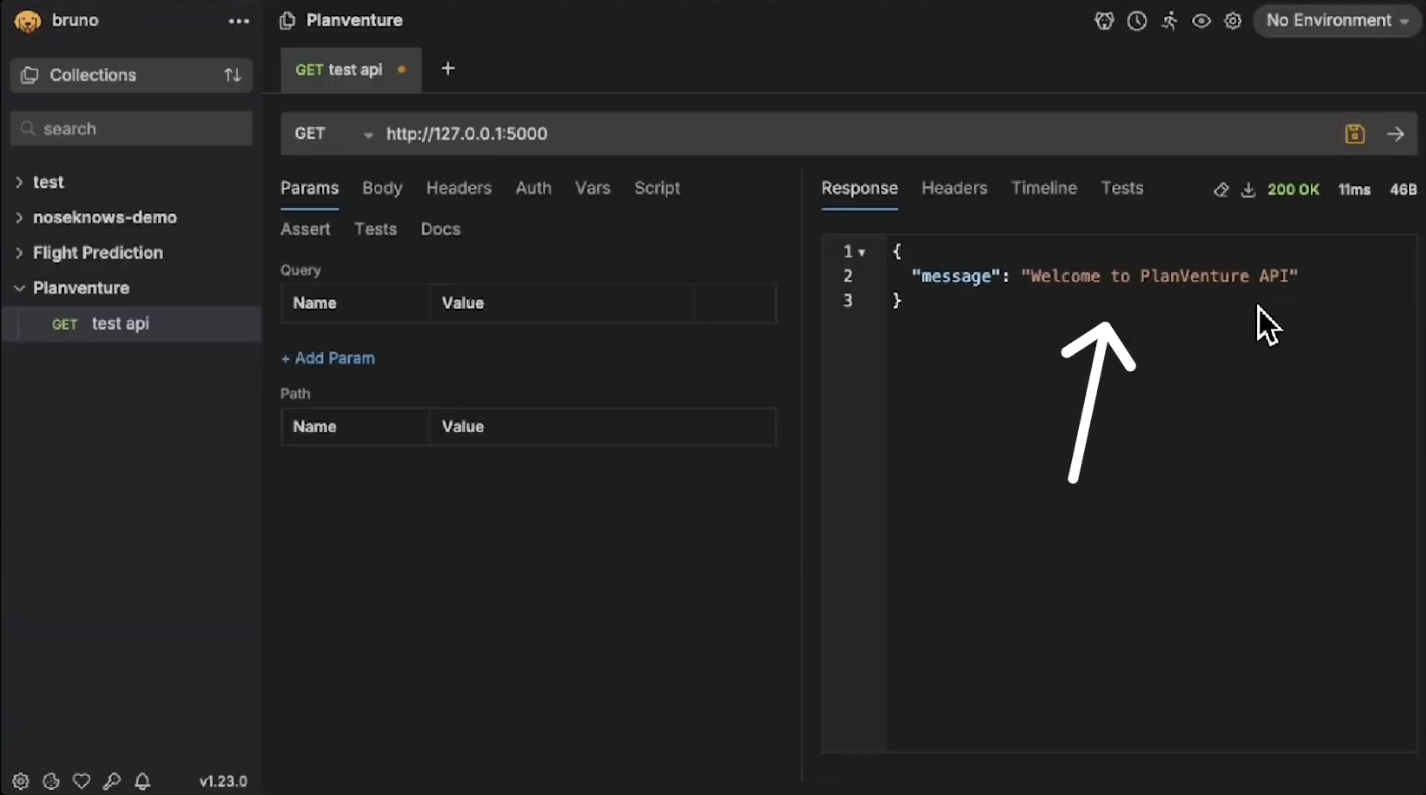
Remember to add venv/ to your .gitignore!
Step 2: Create the Database
Now that you’ve got your environment created, it’s time to start using Copilot to generate some code. We’ll use Copilot Chat and Copilot Edits to generate our database setup.
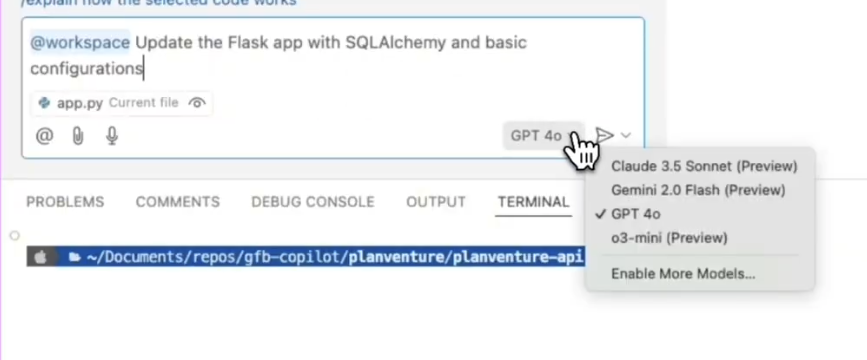
Open the app.py file and Copilot Chat, choose the Ask option, and enter the following prompt:
@workspace Update the Flask app with SQLAlchemy and basic configurations
At the bottom of the chat window, click the model selector and select the Claude 3.5 Sonnet model and send the prompt.
Copilot will provide a plan, a code block, and a summary of suggested changes.
Whenever you receive code suggestions from Copilot, it’s important to review them and understand the changes it’s suggesting. After reviewing the changes, hover over the code block and click the Apply in editor button—the first button in the top-right of the suggested code.
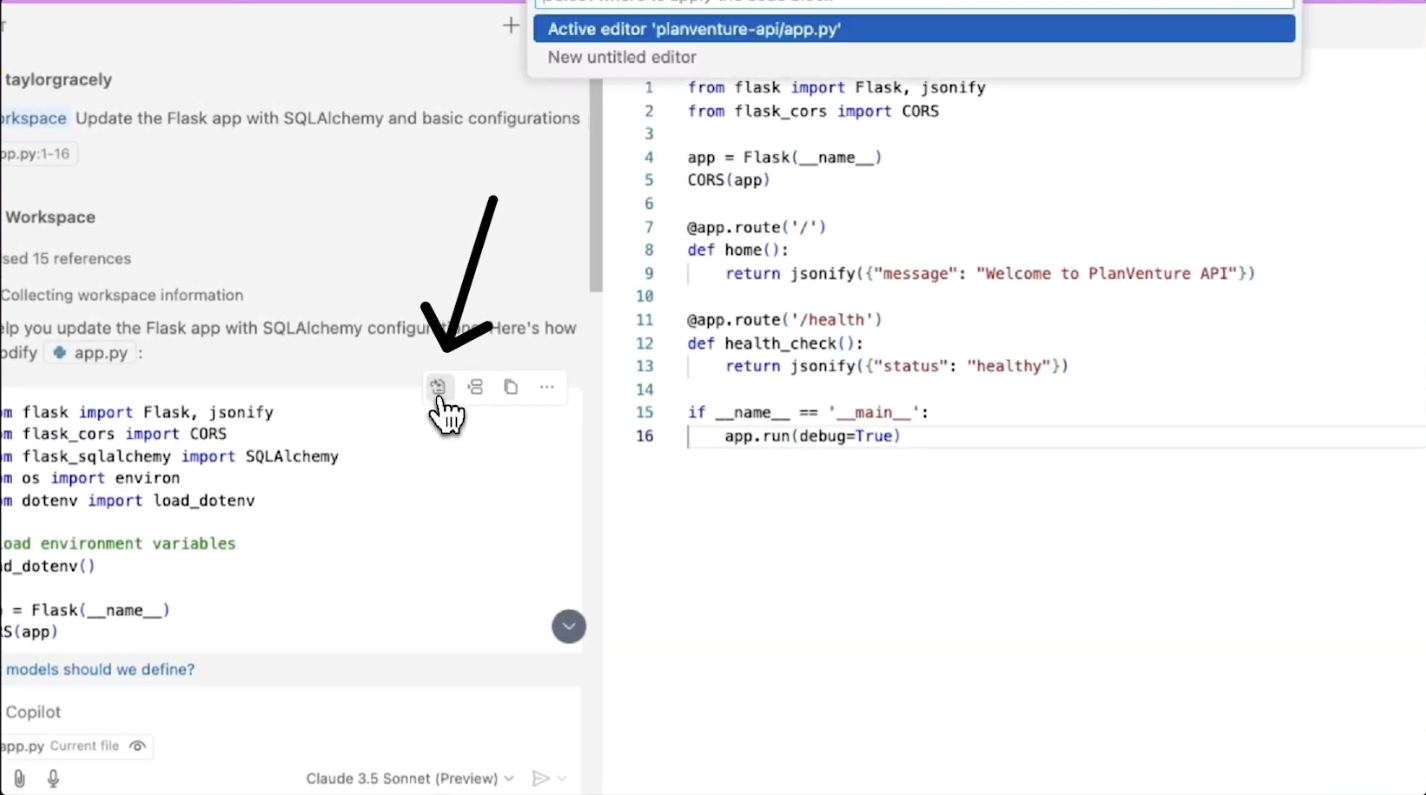
Select the option to apply the changes into the active editor. Copilot will make these updates in the open file. Click Accept to add those changes.
If Copilot provided suggestions that need to be in a new file, hover over the change and select the three dots, then select Insert into New File and save.
Now we need to update our dependencies. Go back to Copilot Chat and enter the following prompt:
@workspace update requirements.txt with the necessary packages for Flask API with SQLAlchemy and JWT
Open the requirements.txt file. Hover over the suggested changes, click the Apply in editor button, and once again select the option to apply the changes into the active editor. Just like before, accept the changes and save the file.
Step 3: Time to create some models
Now it’s time to create our User and Trip models. This GitHub issue describes our requirements. According to the issue, the User model needs an email, a password, and must include password hashing and timestamps. The Trip model needs to have a destination, start and end dates, coordinates, and an itinerary with a user relationship.
To do all of this, we’re going to use Copilot Edits.
Click on the chat icon in your editor, and from the dropdown, select Edits.
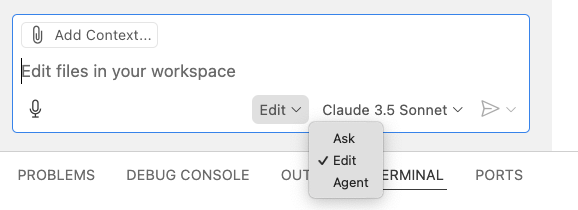
Open your app.py and requirements.txt file and drag them into the chat window. Then choose the Claude 3.5 Sonnet model from the model picker.
Now send the following prompt to Copilot Edits:
Create SQLAlchemy User model with email, password_hash, and timestamps. Add code in new files.
Copilot Edits will then create a plan to do what you asked. It creates some new files and folders, as well as updates existing files. Accept the changes, review the code, and make any corrections necessary before saving the files.
Check the video for examples of things to look for, but remember that your changes might be different. Copilot can provide different suggestions for the same prompts.
Now create a python script to create the database tables. Send Copilot Edits the following prompt:
Update code to be able to create the db tables with a python shell script.
As before, Copilot Edits will go to work and create or edit files as necessary. Accept the code and review the changes, making sure these changes address your needs. After saving the reviewed changes, go back to your terminal and initialize the database by running:
python3 init_db.py
If Copilot Edits created a different filename than init_db.py, use the filename in your project.
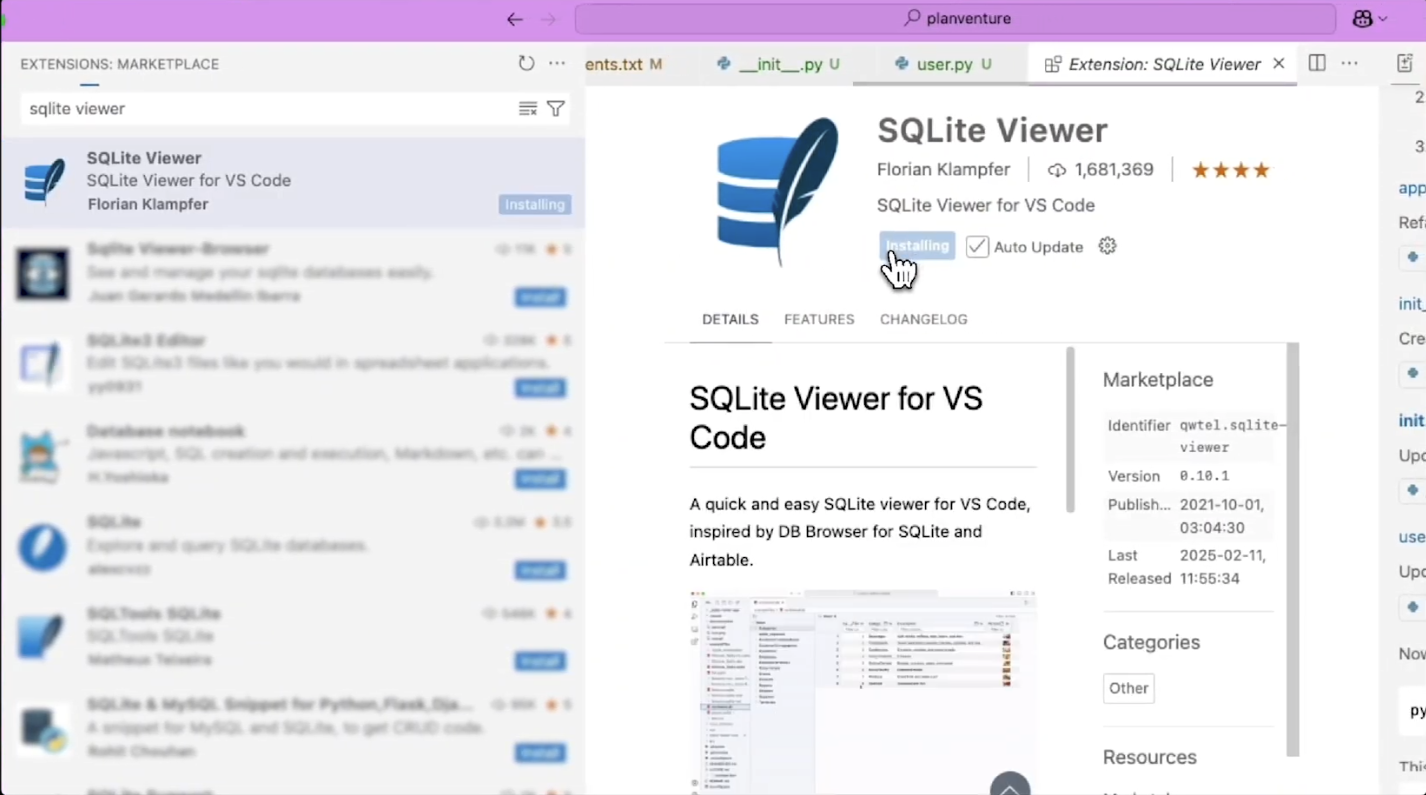
After the script runs, you’ll see a new planventure.db file in your project. However, you need to install an extension in order to see the tables. Navigate to the extensions tab and search for “SqLite viewer”. Click Install, and then click on planventure.db to get a look at the table.
Now that you’ve created the User model, you need the Trip model. Navigate back to Copilot Edits and send:
Create SQLAlchemy Trip model with user relationship, destination, start date, end date, coordinates, and itinerary
By now you can probably guess what you need to do. It’s time to accept the changes and review them, making sure to correct anything that wasn’t exactly what you needed. Go ahead and save the files after you’re satisfied with the updates.
Go back to your terminal and initialize the database again to add the trips table:
python3 init_db.py
Open planventure.db in your editor and verify that the trips table exists.
With both of these models added, it seems like a good time to commit these changes before moving on to the next step. Click the source control button in the left-hand bar in your editor. Hover over the Changes row, and click the plus icon to stage your changes for all of the files below.
In the box for a commit message, click the sparkles button. Copilot will then generate a commit message for you in the box, describing all of the changes! Don’t forget to click the Commit button to commit your changes and update your repository.
Step 4: Adding authentication
We all know that security is important, so it’s time to start talking about adding some authentication to our API. This issue lays out our authentication requirements. According to the issue, we want to make sure we include password hashing and salt for extra security. To get started, we’re once again going to count on Copilot Edits.
Navigate back to Edits and send it the following prompt:
Create password hasing and salt utility functions for the User model.
As always, read the summary of what Copilot did and make sure to review each individual file for the relevant changes. Once you’re satisfied with the updates, save the files.
Next, you need to set up the JWT token and validation. Send the following prompt to Copilot Edits:
Setup JWT token generation and validation functions.
Review the changes, make any adjustments as necessary, and then save the files. Remember that we can’t predict what tweaks might be necessary. This is because Copilot might not give the exact same response to the same prompt. That’s part of the nature of any generative AI, and part of what makes them so versatile. It’s also why you always need to carefully review the suggestions and make sure you understand them.
Now you need to create the actual route so that we can register a new user. Copilot Edits come to our aid again here. Send it the following prompt:
Create auth routes for user registration with email validation.
Go ahead and accept and review these changes. Don’t forget to read the summary that Copilot provides in the Copilot Edits window to help with understanding the updates. Save the files.
And now you have enough code to go ahead and test the route! Head back to Bruno and create a POST request. You’ll start with the same URL you used earlier, back when you sent the GET request to verify the server was up and running. Paste that URL into the POST box, and then add /auth/register to the end. So if your URL was 127.0.0.1:5000, the full URL would be 127.0.0.1:5000/auth/register. Click the Body tab and select JSON from the pull down menu at the top. Enter the following text into the large box for the body.
{
  "email": "[email protected]",
  "password": "test1234"
}
Such a secure password! Obviously, this is just for the demo. When you’re creating actual accounts, make sure to use a stronger, more secure password. Note that you don’t need to set up an auth token yet because you’ll get that access token from the server when you register.
Continuing with setting up our test, click the Headers tab. Add a header with the name Content-Type and a value of application/JSON.
Now it’s time to test the connection. Click the arrow at the end of the POST row. If everything is working and set up correctly, you’ll receive a 200 response.

Once you get that response, go back to VS Code and open the planventure.db file. Refresh the file and select the users table. The user you just added will be represented in the table.

With this piece complete, you now need to add the login route. In order to do this, you’re going to keep using our good friend Copilot Edits. Send it the following prompt:
Create login route with JWT token generation.
Copilot will make suggestions to give you the full route that you can accept and test right away in Bruno. Switch back to Bruno, and hover over the POST register request in the left-hand window under Planventure. Click the ... to show the context menu, and select Clone. Change the request name to login and click Clone. Click the arrow to send the command, and you should receive a message that the login was successful.
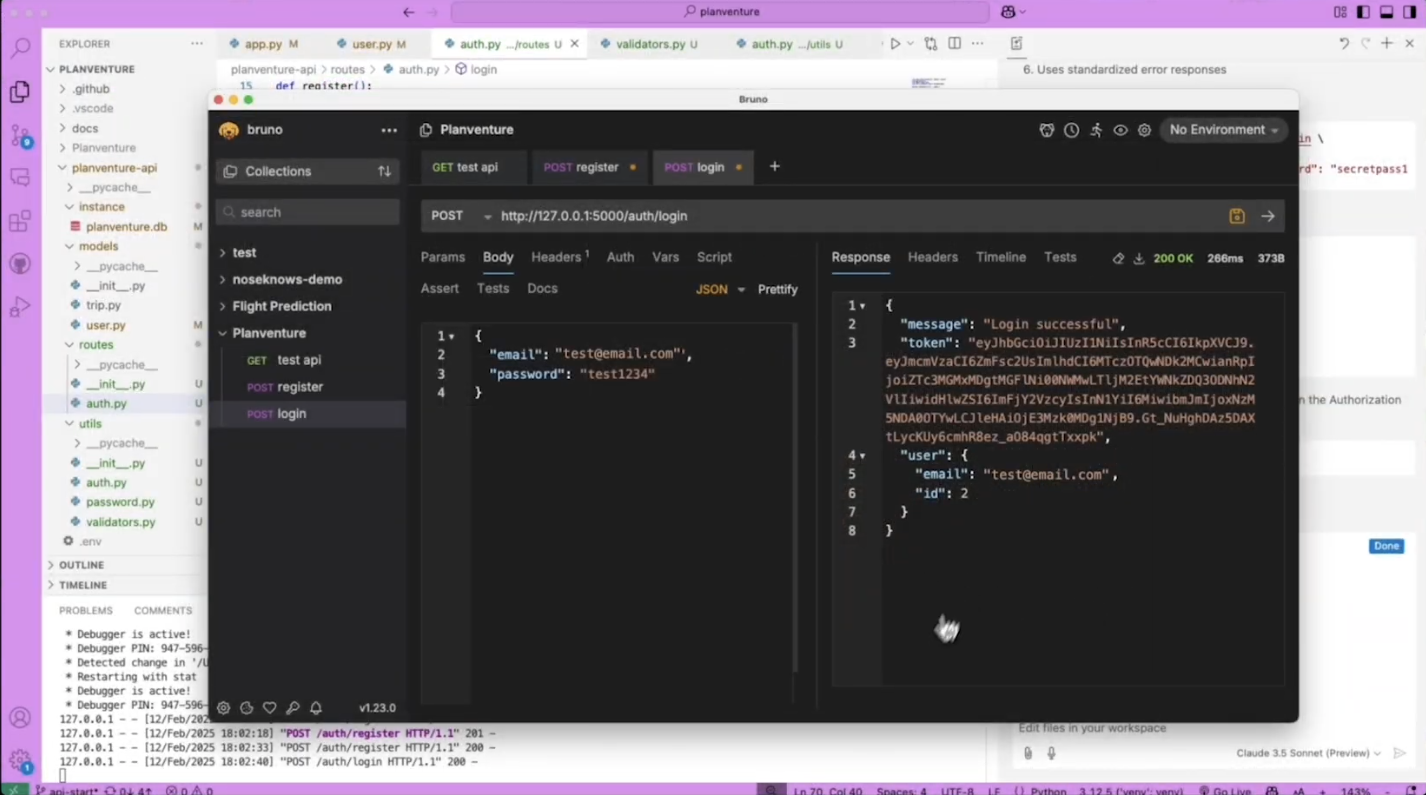
Congratulations, your login route is working! Users can now register and log in successfully.
The next thing you need to do is add an auth middleware to protect your routes. Head back to Copilot Edits to continue coding using natural language and send it this prompt:
Create auth middleware to protect routes.
Review and accept the changes, then head back to Bruno to test the routes again. Navigate back to your POST login request, and click the arrow once again to send the command. If you receive a message that the login was successful, everything’s working perfectly.
Now that you’ve finished adding authentication to your code, make sure to commit your changes and push them up to GitHub. Remember that you can use the sparkles button to have Copilot create a commit description for you! Just remember to review it before submitting.
Step 5: Adding trips
You’ve got the users, but in order to use Planventure, users need to be able to add trips. The scope of this work is captured in this issue. In order to cover our needs, the trip route needs full CRUD operations with a default itinerary template. Since we’ve had so much success with it so far, let’s keep using Copilot Edits.
Send it the following prompt to get started:
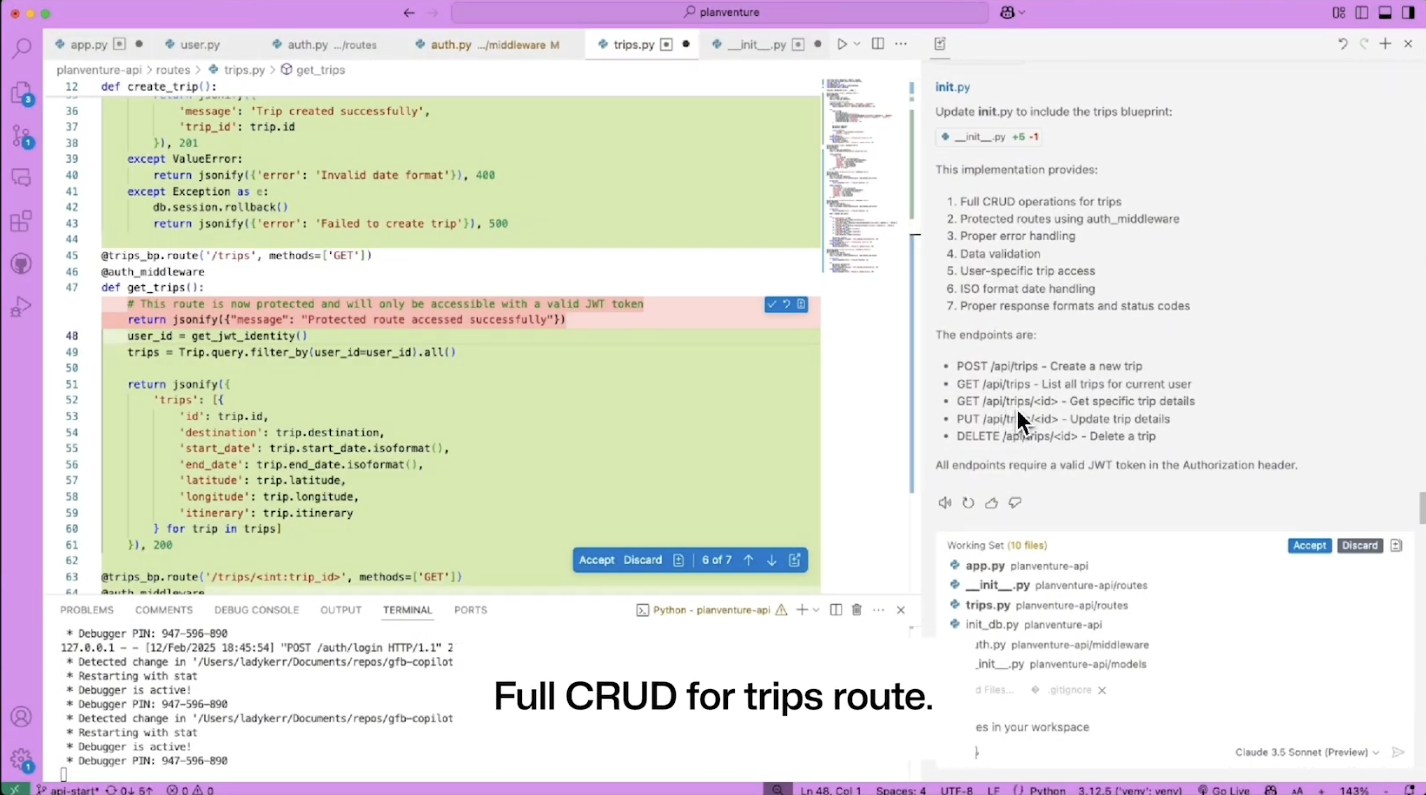
Create Trip routes blueprint with CRUD operations.
The expectation is that you’ll get the CREATE, READ, UPDATE, and DELETE routes with this prompt. Just like you did before when adding authentication, make sure to review the changes and that you understand what changed. Make any necessary adjustments, and then save the files.
Once you’ve accepted these changes, use Copilot Chat to generate some sample data. It’s much easier to have Copilot create it than to do so manually. Open up your chat window and send it the following prompt:
Create example json to test the trips route
Copilot will create some sample data that you can use to test your routes. Hover over the supplied JSON code and click the Copy button.
Go back to Bruno, and clone the POST login request. Change the name to CREATE trip and click the Clone button. Change the POST address from <IP>/auth/login to <IP>/api/trips. Click the Body tab and replace the body with the JSON you copied to the clipboard in the previous step.
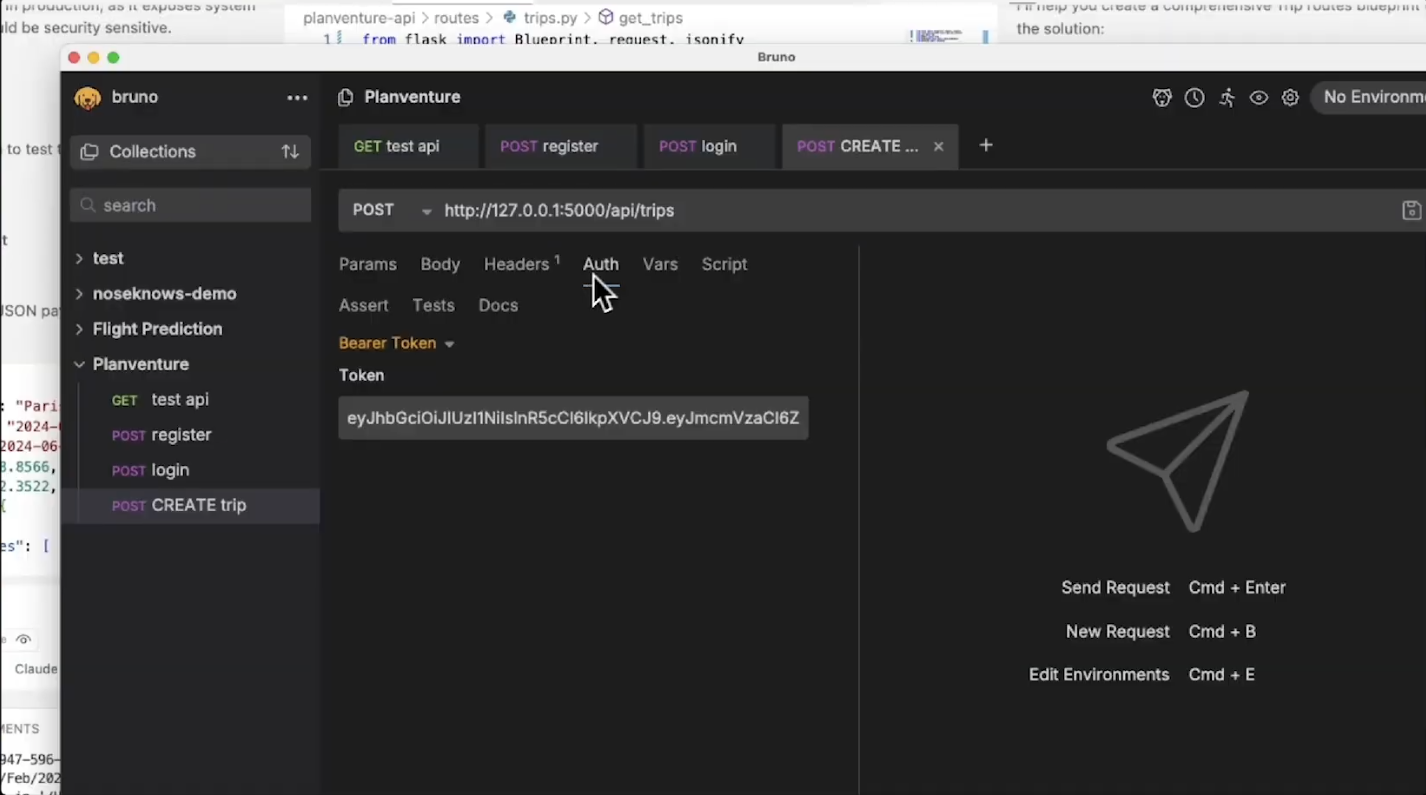
Before sending this request, we need to add our authorization token. Navigate to the POST login request by clicking that tab at the top of the window. Click the arrow to send the command, and then copy the token value. Click the POST CREATE trip tab at the top, and then the Auth tab underneath the POST address. Make sure that the type of authorization is Bearer Token, and then replace any text in the Token field with the token you copied from the login request.
If you run into an error, copy the error message and head back to VS Code to get Copilot’s help debugging the error. Use the /fix slash command in the Copilot Chat window, and then paste the error message. To watch a demo of this process, you can check the video version of this GitHub for Beginners episode.
After performing any necessary debugging, you should receive a response that the trip was successfully created. You can verify this by going back to VS Code, opening the planventure.db file, refreshing it, and looking at the trips table.
You can now add trips to your database! Now it’s time to test getting a trip id.
Go back to Bruno and clone the POST CREATE trip request. Rename it to GET trip id and click Clone. Click POST at the top to open a dropdown menu, and select GET to change the request to a GET request. Click the Body tab and delete the current body. Update the URL to include the ID of the trip you want to fetch. For example, 127.0.0.1:5000/api/trips/1. Click the arrow to send the command, and the response should include all of the trip data in the database that matches that trip id. Just like before, if you run into any errors, you can use Copilot Chat to help you debug them until you’re able to successfully receive a response.

With this working, it’s time to add the default itinerary template. If you guessed that you’d be using Copilot Edits to help you out here, you’d be right! Go ahead and send it the following prompt:
Create function to generate default itinerary template.
As always, give the code changes a review and make sure you know what the code does. Save the files, and give it a test. Go back to Bruno, and select the POST CREATE trip request. Change something in the body, such as the destination, and send the request by clicking the arrow icon. If you run into any errors, use Copilot Chat to help you debug them and suggest code changes to address them.
When you successfully add a new trip, you then want to verify that it uses the default itinerary. Select the GET GET trip id request, and update the URL to match the id of the trip you just created. For example, if this was the second trip you added, change the last part of the URL to /2. Check the response, and verify that it’s using the default itinerary. If it is, well done! You’ve now addressed the requested changes for this issue! That means it’s time to commit these changes.
Don’t forget about CORS
There’s a lot more we can add to this API, but for now this is getting good enough for an MVP. Before declaring it done, let’s add a basic health check endpoint. Head over to Copilot Edits, and send it the following prompt:
Setup CORS configuration for React frontend.
Review the changes, then go ahead and accept them.
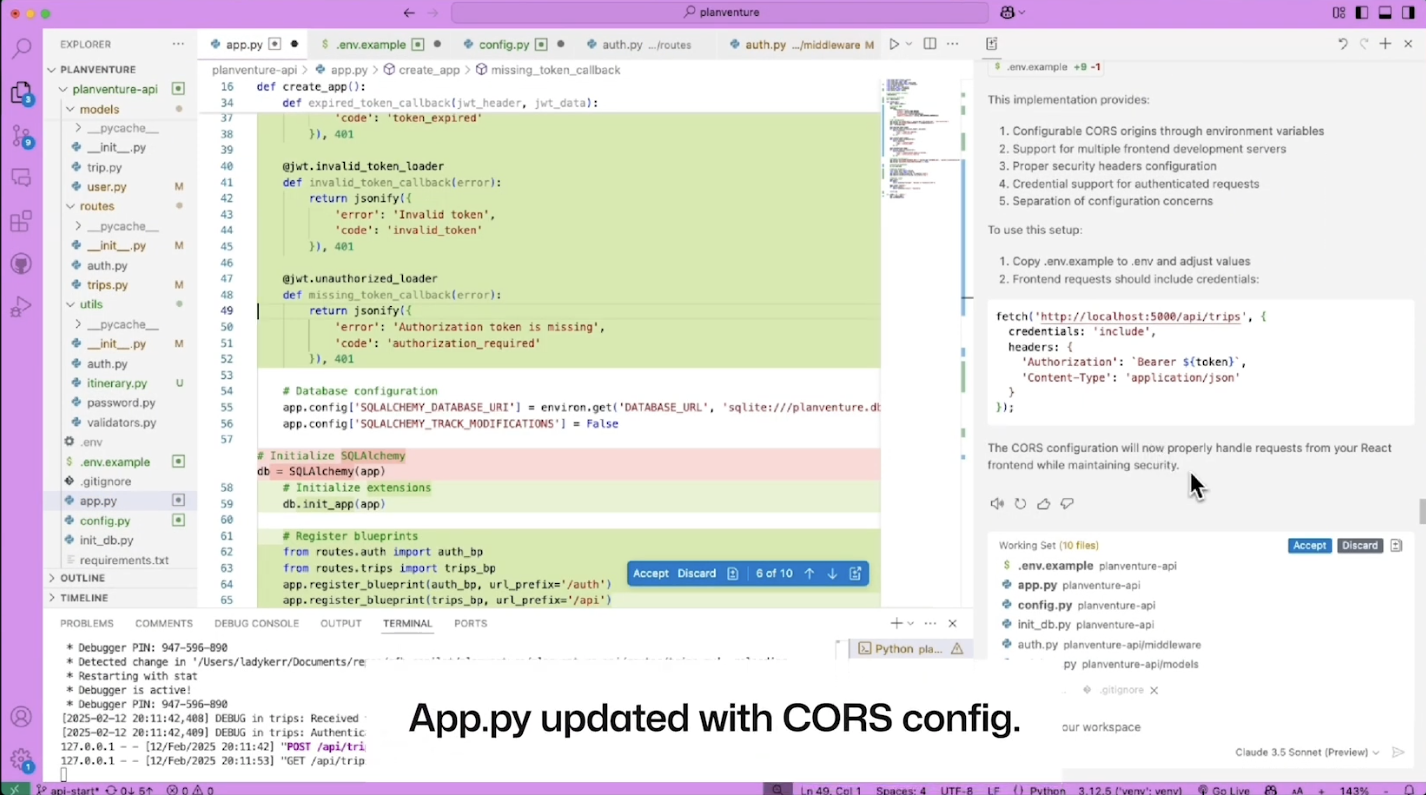
With this, you’ve completed the MVP of the API. That means you just created an API with GitHub Copilot!
Some finishing touches
Before declaring this MVP complete, you should add some documentation to the README. Luckily, Copilot Chat helps speed up this process. Open up Copilot Chat and send it the following prompt:
@workspace create a detailed README about the Planventure API
Copilot will generate a README for you, describing how the API works. Hover over the text, select the ... button, and select Insert into New File. Save the file as README.md, and you now have a valid README file for your project. Simple and easy! With this, there’s no reason for anyone to have empty README files in their projects.
You should also write some tests and include them in your project before declaring this fully complete, but that’s beyond the scope of this episode. Just remember that it’s something you should do, and you can use Copilot Chat to help you do it! Especially if you use the /tests slash command. Spoiler alert: we’ll be covering this in a future episode!
Your next steps
That was a lot! But, you have now built an entire API and used the power of Copilot to do it. Not only that, but you used Copilot to help create documentation, making it easier for others to pick up, use, and contribute to your project.
Check out the repo so you can build this project from scratch, and be sure to read the README so you know which branch to start from.
Don’t forget that you can use GitHub Copilot for free! If you have any questions, pop them in the GitHub Community thread, and we’ll be sure to respond. Join us for the next part in this series, where we’ll build a full app using this API we created.
Happy coding!
The post GitHub for Beginners: Building a REST API with Copilot appeared first on The GitHub Blog.